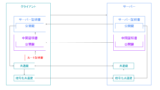
前回、SSL/TLS通信やSSL証明書の発行の仕組みを勉強したので、改めて自己証明書(オレオレ証明書)の発行をやっていきます。今回は、Google Chromeにオレオレ証明書をインポートしてブラウザで「https」と「wss」の通信をするところまでやってみます。
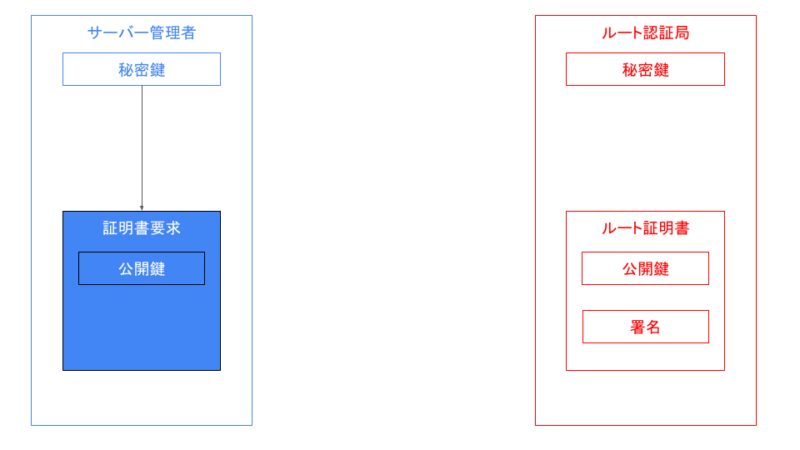
認証局の秘密鍵を作成
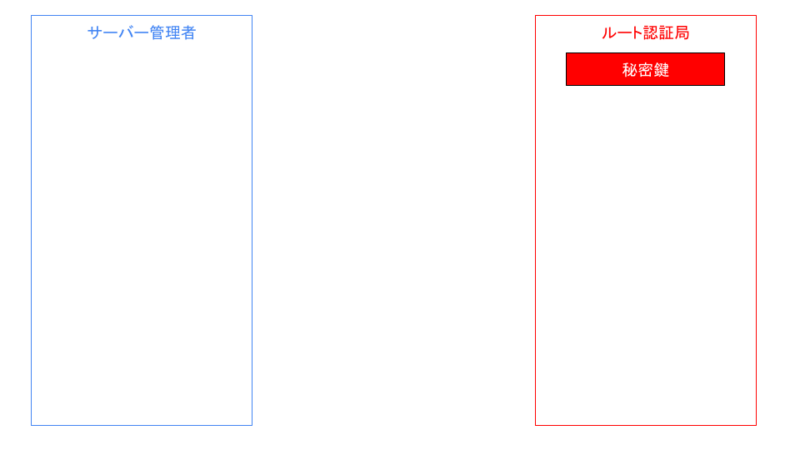
$ openssl genrsa -des3 -out ca.key 2048
Generating RSA private key, 2048 bit long modulus (2 primes)
......................+++++
.+++++
e is 65537 (0x010001)
Enter pass phrase for ca.key:
Verifying - Enter pass phrase for ca.key:
$ ls
ca.key
ca.key が認証局の秘密鍵になります。
認証局の自己署名証明書を作成
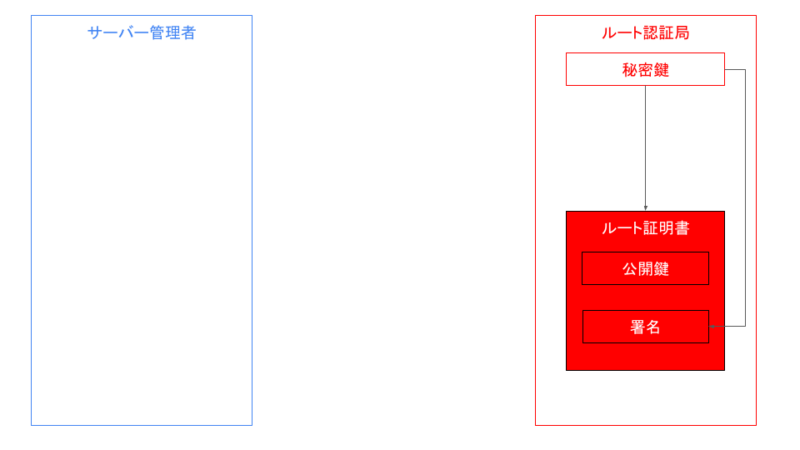
$ openssl req -new -x509 -days 1826 -key ca.key -out ca.crt
Enter pass phrase for ca.key:
You are about to be asked to enter information that will be incorporated
into your certificate request.
What you are about to enter is what is called a Distinguished Name or a DN.
There are quite a few fields but you can leave some blank
For some fields there will be a default value,
If you enter '.', the field will be left blank.
-----
Country Name (2 letter code) [AU]:JP
State or Province Name (full name) [Some-State]:
Locality Name (eg, city) []:
Organization Name (eg, company) [Internet Widgits Pty Ltd]:localCA
Organizational Unit Name (eg, section) []:
Common Name (e.g. server FQDN or YOUR name) []:
Email Address []:
$ ls
ca.crt  ca.key
ca.crt がルート証明書(オレオレ証明書)になります。入力項目はすべて空白でも問題ないかと思いますが、なんか気持ち悪いので「Country Name」は日本にして、インポート後の確認のために「Organization Name」は適当に入力しています。
本来であれば証明書請求を作成してから署名という流れになるんだとおもいますが、今回はまとめてやってしまっています。
サーバーの秘密鍵を作成
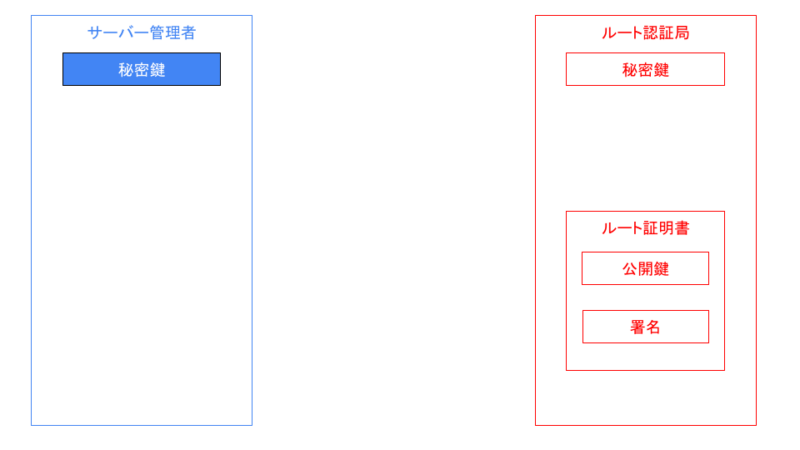
$ openssl genrsa -out server.key 2048
Generating RSA private key, 2048 bit long modulus (2 primes)
..................................................................................................................................................................................................................+++++
........................................................................................................+++++
e is 65537 (0x010001)
$ ls
ca.crt  ca.key  server.key
server.key がサーバーの秘密鍵となります。
サーバーの証明書要求を作成
$ openssl req -new -out server.csr -key server.key
You are about to be asked to enter information that will be incorporated
into your certificate request.
What you are about to enter is what is called a Distinguished Name or a DN.
There are quite a few fields but you can leave some blank
For some fields there will be a default value,
If you enter '.', the field will be left blank.
-----
Country Name (2 letter code) [AU]:JP
State or Province Name (full name) [Some-State]:
Locality Name (eg, city) []:
Organization Name (eg, company) [Internet Widgits Pty Ltd]:
Organizational Unit Name (eg, section) []:
Common Name (e.g. server FQDN or YOUR name) []:
Email Address []:

Please enter the following 'extra' attributes
to be sent with your certificate request
A challenge password []:
An optional company name []:
$ ls
ca.crt  ca.key  server.csr  server.key
server.csr がサーバーの申請書要求になります。入力項目は「Country Name」だけ入力しています。本来は「Common Name」にドメインを入力するのですが、今回はこのあとの手順で対応しています。
SANの設定ファイルを作成
ファイル名はなんでもいいですが、サーバー証明書にSANを設定するためのファイルを作成します。
$ ls
SAN.txt  ca.crt  ca.key  server.csr  server.key
subjectAltName = DNS:localhost「SAN」とは、「Subject Alternative Name」の略称で、SSLサーバー証明書の拡張領域となります。Google Chrome58以降は、「Common Name (CN)」への対応が廃止されたので、「Subject Alternative Name (SAN)」という拡張領域が必要になります。
SANはコンマ区切りで複数設定でき、「DNS: *.tsuneken5.com」といったワイルドカードを使ったり、「IP:127.0.0.1」でIPアドレスも設定できます。
サーバーの証明書要求に署名する
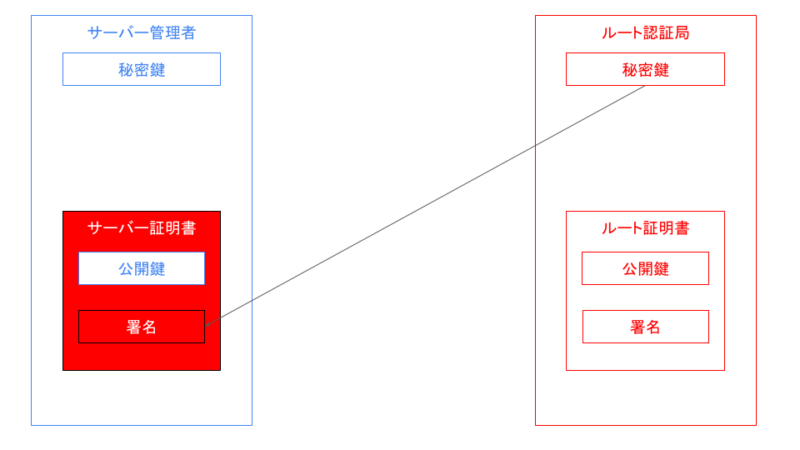
$ openssl x509 -req -in server.csr -CA ca.crt -CAkey ca.key -CAcreateserial -out server.crt -days 360 -sha256 -extfile SAN.txt
Signature ok
subject=C = JP, ST = Some-State, O = Internet Widgits Pty Ltd
Getting CA Private Key
Enter pass phrase for ca.key:
$ ls
SAN.txt  ca.crt  ca.key  ca.srl  server.crt  server.csr  server.key
server.crt がサーバー証明書となります。「-days 360」で有効期限を360日にしていますが、オレオレ証明書なのでもっと長くしてしまって大丈夫です。
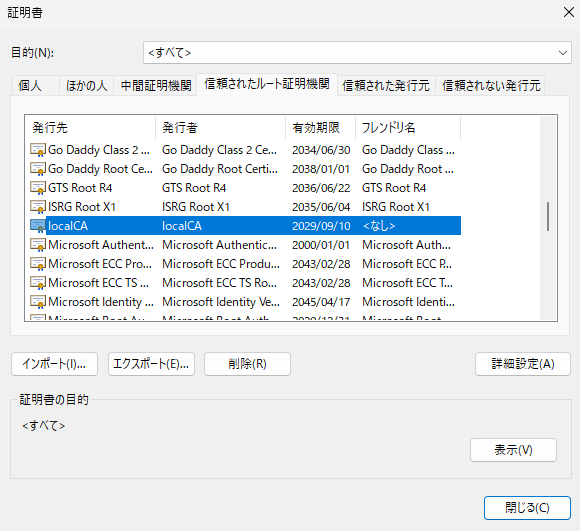
オレオレ証明書をGoogle Chromeにインポート
Google Chromeに ca.crt をインポートします。
インポートの方法は、Google Chromeの「設定 > プライバシーとセキュリティ > セキュリティ > 証明書の管理」の「信頼されたルート証明書」タブからインポートします。
httpsで確認
Node.jsで簡易的なサーバーを準備します。
const express = require('express');
const app = express();
const fs = require('fs');

const server = require('https').createServer(
  {
    key: fs.readFileSync('./ssl/server.key'),
    cert: fs.readFileSync('./ssl/server.crt'),
  },
  app
);

// GET
app.get('/', (req, res) => {
  res.send('Hello World!');
});

server.listen(3000, () => {
  console.log('Server listening on port 3000');
}); 「node index.js」で起動後、Google Chromeで「https://localhost:3000/」にアクセスして警告なしで「Hello World!」が表示されればOKです。
wssで確認
MQTTで確認します。BrockerはDockerで作成しますが、 mosquitto.conf の内容を少し変更します。
allow_anonymous true

listener 1883
protocol mqtt

listener 8083
protocol websockets

listener 8883
protocol mqtt
cafile /mosquitto/certs/ca.crt
keyfile /mosquitto/certs/server.key
certfile /mosquitto/certs/server.crt
# 証明書の検証を無効にする
require_certificate false
tls_version tlsv1.1

listener 8084
protocol websockets
keyfile /mosquitto/certs/server.key
certfile /mosquitto/certs/server.crt

tls_version tlsv1.1
listener 8084 の cafile /mosquitto/certs/ca.crt を削除しています。むしろSSL/TLS通信の仕組みを勉強した今だとこっちの方が正解だと思ってます。
確認用のコードはこっちになります。
<!DOCTYPE html>
<html lang="ja">

<head>
  <meta charset="utf-8">
  <title>mqtt sample</title>

  <script src="https://code.jquery.com/jquery-3.7.1.min.js"
    integrity="sha256-/JqT3SQfawRcv/BIHPThkBvs0OEvtFFmqPF/lYI/Cxo=" crossorigin="anonymous"></script>
  <link href="https://cdn.jsdelivr.net/npm/bootstrap@5.3.0/dist/css/bootstrap.min.css" rel="stylesheet"
    integrity="sha384-9ndCyUaIbzAi2FUVXJi0CjmCapSmO7SnpJef0486qhLnuZ2cdeRhO02iuK6FUUVM" crossorigin="anonymous">

  <script src="js/index.js"></script>
  <script src="https://unpkg.com/mqtt@5.10.0/dist/mqtt.min.js"></script>
</head>

<body>
</body>

</html>
let client = {};
const MQTT_BROKER = 'wss://localhost:8084';
const TOPIC = 'mytopic';
function setupMqtt() {
client = mqtt.connect(MQTT_BROKER);
client.on('connect', () => {
client.subscribe(TOPIC, (error) => {
if (!error) {
console.log(TOPIC, 'is connected');
client.publish(TOPIC, 'This is a test.')
} else {
console.log(error);
}
})
});
client.on('message', (topic, message) => {
if (topic == TOPIC) {
console.log('subscribe:', topic, message.toString());
}
});
}
$(document).ready(() => {
setupMqtt();
console.log('finish setup mqtt')
});Google Chromeで「http://localhost:8080/」にアクセスして(※)、コンソールに「subscribe: mytopic This is a test.」が表示されればOKです。
※ http-server でサーバーを立てて確認
コメント